
Friday 27 February 2015
Lotus Blossom and Build A Bow Punch
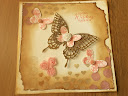
Good morning to you, hope this finds you well. This used the new Lotus Blossom stamp set which is free when you spend £45 pound on Stampin Up goods. It's a beautiful stamp and can be used for many occasions. It is a three step stamp and I used Wisteria Wonder and Elegant Eggplant inks and card stock as well as Whisper White c.s. The base card is Whisper White then a mat of Elegant Eggplant is used which has been embossed using the Lovely Lace folder. Onto a further mat of Whisper White c.s. Stamp the Lotus Blossom flower once then mask with a sticky note that has been stamped onto then cut out leaving some of the sticky underneath so it will stick to the stamped picture underneath. Then you can stamp the flower another twice, once either side and if it over laps at all it will stamp onto the mask. When finished remove the mask and it will look as if the two side flowers are behind the front flower. Now add the stem stamp. Onto a separate pice of white card stamp the sentiment and cut a mat of Elegant Eggplant. Before building up the card use the Project Life Corner Punch and round all the corners on all pieces of card then affix together. The sentiment has some Dimensionals behind it before it is matted onto the card. I then stamped some Whisper white card with the I Love Lace stamp that had been inked with Elegant Eggplant. Once dry I cut out this card using the Build A Bow Punch and affixed the pieces together. This was then attached to the top left hand corner of the card. Take care now, Joanne x
Wednesday 25 February 2015
Grunged Butterfly Basic
Hello there, hope all is well with you. With this one I got a little down and dirty hehe! The card is 8"x8". I cut a mat in Very Vanilla card stock 71/2"x71/2". Firstly I used the Hearts and the Dots from the Decorative Mask sets and with Acrylic paints matching Crisp Cantaloupe and Very Vanilla I started to decorate the mat. I partly sponged through the mask with the matching cantaloupe paint in two opposing corners and then heat set with the heat tool. I did the same with the dot stencil. Once I was happy with that I tore the mat, I wanted quite a distressed look as you can see! Using a Silicone Craft Sheet I then applied Soft Suede Ink around the edges of the mat with sponge and circular movements. Again you can do a lot or a little it's your preference.
I them stamped a sentiment in the top right of the mat in Crisp Cantaloupe. This can then be attached to the card. 3 butterflies were stamped in same colour on Very Vanilla then die cut. A die cut of the Middle butterfly in Soft Suede and a large one in Gold Foil sheet were also used for the middle butterfly. These were attached in the centre to allow wing movement.
to finish the card the 3 resin flowers from the Artisan Embellishment kit were attached to the butterflies and 3 of the Crisp Cantaloupe roses from the ribbon were cut separately and attached to the card. All for now, Joanne x
Tuesday 24 February 2015
3 Basic Butterflies
Good morning. Here's the fourth in the Butterfly Basics, utilising the Artisan Embellishment Kit. Again I've used Very Vanilla and Rose Red c.s. and ink as well as the Rose red crochet ribbon.
The base card is Very Vanilla and a Rose Red mat was applyed to this flat. Then I took the smaller Vanilla mat.
I started with the honeycomb stamp and Sahara Sand ink pad and using the heel of my hand stamped around the edge of the mat which gave an uneven appearance. I then stamped three of the butterflies directly onto the card in Rose Red ink, ensuring I left enough room at the base of the card to wrap the ribbon around. Whilst using this colour stamp Happy Birthday in the top right corner.I them stamped the butterfly a further 3 times and die cut them out with the Butterfly Thinlits. These are just glued down in the centre to allow movement of the wings. The interrupted line is stamped in Sahara Sand and put on Dimensionals to give some height on the left side of the card. Using the flower from the Itty bitty punch set and the coordinating flower from the Something to Say stamp set I stamped in Rose Red And Sahara Sand then punched them out. They were dotted about the card to give another dimension. Hope you like it, bye for now Joanne x
Monday 23 February 2015
Artisan Butterfly Basics
Good morning lovelies, I've made this card in two different colour ways (crisp cantaloupe or Sahara sand) for the purposes of the blog I will discuss the card using Crisp Cantaloupe.
The base card is Very Vanilla. Then l cut a mat of Crisp Cantaloupe c.s.and embossed it using the Lovely Lace embossing folder.
I cut a mat of Very Vanilla and using Crisp Cantaloupe ink I made a background. To do this I used the Honeycomb stamp from the Butterfly basics stamp set, a Rose Stencil from the Artisan Embellishment kit and lastly the tiny splatter stamp from Gorgeous Grunge. I alternated between the three along the edges of the Vanilla mat.
Then l made another mat of Crisp Cantaloupe and embossedit with same folder.
I stamped the flower from the stamp set on Very Vanilla c.s. and then on some scraps l stamped the flower heads another twice and hand cut them to decoupaged them onto the picture.
Using the butterfly from the Basic Butterfly stamp set l stamped 2 in Sahara Sand for a contrast and punched them out using the Bitty Butterfly punch then adhered them to the picture.
to finish l used one of the sentiments stamped onto Very Vanilla and matted onto Crisp Cantaloupe.
The Rose Ribbon was added to the bottom of the card from the Artisan Embellishment kit.
If you look at the picture one card is distressed the other is normal, l think each technique lends itself nicely to this card.
Have a great day now, take care, Joanne x
Saturday 21 February 2015
Grunged Butterfly Basics
Good morning my lovelies here's the second installment of the Butterfly Basics. The base card is Very Vanilla and I have used Gorgeous Grunge to create a background. From the Artisan Embellishment Kit I used the Rose Red crochet ribbon with the 1/8 gold taffeta ribbon one on top of the other and a gold bow. I made a mat of Rose Red c.s. and then a mat of Very Vanilla. These were both distressed around the edges. I stamped the flower in Versamark and then used Gold Embossing Powder, remove the excess then heat set. I then used the Gorgeous Grunge stamp and added some to the surrounds of the flower. The sentiment was stamped in Versamark and Gold Embossing Powder again. Thanks for looking, all for now, Joanne xx
Thursday 19 February 2015
Butterfly Basics Shaker Card
Hello there, I just loved this Butterfly Basics stamp set and Butterfly Thinlits Dies as soon as I saw them and "needed them" as usual, but I also loved the Artisan Embellishment Kit which is on the same page as the other sets. As you know I run regular classes so l decided to use all the elements together and get a few classes from their use. For this card l used Pear Pizzaz as the base and used the Fern stamp and Pear Pizzaz ink and stamped around the edge of the card to give me a back ground.
I then made a mat in Whisper White card and onto it again stamped the Fern in the same colour four times in the bottom right of the card and three times in the upper left. I gradually shortened the Fern and turned it slightly with each stamp. I cut a piece of White Vellum to cover the White card mat and rubbed over it with the Embossing Buddy. I used the flower from the Basic Butterfly stamp set and stamped onto the centre of the vellum using Blackberry Bliss Ink, immediately sprinkling Clear embossing powder over the ink then shaking off the excess. I then heat set this from the underneath of the vellum. I then stamped the Happy Birthday sentiment using Pear Pizzaz ink.
I then punched out various circles using punches and placed then on the centre of the stamped white card. Placing the stamped Vellum over the top I used a sewing machine to sew the two pieces together forming a Shaker Card.
The Blackberry Bliss Velvet Ribbon from the Artisan Embellishment Kit was wrapped around the card front twice and secured on the back. I made them cross over for an added effect. One of the Basic Metal buttons from the kit was used and stuck on with glue dots. This was then matted onto the base card. I really enjoyed making this card and it used a few differing techniques to get the finished result. Thanks for looking, hope you are looking forward to seeing the other cards in the series, all for now, Joanne xx
Wednesday 11 February 2015
Stacked With Love and You Plus Me
Good Morning hope this finds you well. Here's another card using the Stacked With Love DSP. A card base was made and matted and layered with basic black and whisper white. Two pieces of the red DSP was used on top of the card mats. A strip of black card 1cm in width divided the papers. Two hearts were punched out of the Silver Glimmer paper and added to this. A sentiment from the You Plus Me stamp set was stamped onto Whisper White card stock using Real Red ink. I added a metal arrow that I had in my stash. All these products can be ordered from Stampin Up via me. Thanks Joanne xx

Monday 9 February 2015
Guy Greetings and Typeset
Hello there, here's a guy card today, plain and simple but effective I think, hope you do too. The base card is 15x15cms. Onto that is matted a piece of Typeset DSP. As you can see I've made both cards slightly different. One is a smaller square the other is a rectangular piece. Either way they are stamped with the car in Early Expresso Ink onto Very Vanilla Card Stock then matted onto Early Expresso c.s. 1/8 Taffeta Ribbon, Basic Black has been put across the card on side slightly higher than the other or on two opposing corners. To finish the ribbon a Basic Metal Button was threaded with the ribbon and tied off then stuck to card with glue dots.The sentiment "To A Classic" is stamped and matted the same way as described earlier and placed onto the card as you wish.

Friday 6 February 2015
Stacked With Love Mini Treat Bag
Good or morning my friends, I made this little bag with the Stacked With Love DSP. It requires two pieces of the paper which is cut using the Mini Treat Bag dies. Once the front panel was cut it was run through the Bigshot with the heart die in the centre to form a window. Before the bag was assembled a piece of Window sheet was cut to cover the apperture. It was decorated with two banners cut with the banner dies and 2 hearts using the Itty Bitty Punch pack. take care now, Joanne xx

Wednesday 4 February 2015
Stacked With Love, Banner Dies and Amazing Birthday
Hello there, here's today's instalment. The Stacked With Love DSP are very versatile here I have used them for a male card. Using a sentiment from the Amazing Birthday and stacked it onto Banners cut from Real Red and Basic Black card stock. Arrows were cut from the Label Card Dies and added to the card using darker coloured card to add a shadow. Basic Black Taffeta Ribbon was added to the centre of the card to finish it. Thanks for looking, Joanne xx

Tuesday 3 February 2015
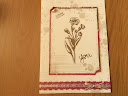
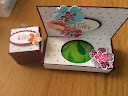
Flower Shop, Petite Petals and Sweet Taffy
Well hello there, hope this finds you well. This is a little set that I've put together for those who are not 100%. It uses the Gift Box Punch Board for the cough sweet box. I decorated the set using the Sweet Taffy DSP as they are bright and cheerful and I stamped flowers in these bright colours to continue the cheerfulness. We all need a little comfort when we are feeling under the weather, I think! Until next time take care, all Stampin Up goods can be bought via me, contact me if you would like further directions, thanks Joanne xx


Monday 2 February 2015
Something Borrowed and Tag Talk 2
Hi there, this is a larger version of the card I made for my swaps earlier this month. It's using Sahara Sand ink and card stock. Whisper White card stock and Petal Potpourri stamp set. The Champagne Glimmer paper looks lovely with this colour combination. The card was finished with a sentiment from the Tag Talk stamp set punched out using the Label Bracket punch. All products can be purchased via me, thanks Joanne xx

Subscribe to:
Posts (Atom)